The majority of cloud providers offer managed Kubernetes services, serverless compute engines, container registry services and many more, that are tailored to containerized workloads. Serverless technology and K8s-based managed services allow organizations to focus on applications rather than hosting deployments and maintenance.
Nowadays, Organizations have become more and more interested in containerized deployments in the cloud because they enhance agility and flexibility for true digital transformation.
Elastic Kubernetes Service (EKS)
AWS Elastic Kubernetes Service (Amazon EKS) is a managed service that lets us manage a Kubernetes Cluster without having to install, operate, or maintain our own control planes and nodes. Kubernetes is open-source software that automates the deployment, management, and scaling of containerized applications. AWS provides resources like EC2, S3, Fargate, and EKS.
EKS is integrated with various AWS services-
- ECR (Elastic Container Registry) to store container images.
- IAM users and policies for providing authorization and authentication.
- Elastic Load Balancer (ELB) for distributing traffic.
- Virtual Private Cloud (VPC) for isolating resources.
Read Also: How to Deploy the Kubernetes Dashboard on an Amazon EKS
AWS Fargate
The AWS Fargate service allows customers to deploy containers in AWS Elastic Container Registry (ECS) and AWS Elastic Kubernetes Service (EKS) without creating or managing servers themselves. This eliminates over-provisioning and waste by creating only the compute resources needed to run the containers.
The optimized deployment ensures that you only pay for the resources that are needed for the application. With Fargate Spot and compute savings plans, costs can be further reduced. It is possible to save upto 60% on workloads that are tolerant to interruptions, while saving 50% to 80% on workloads that are persistent.
EKS and AWS Fargate combined run serverless containers on Kubernetes, which offers security, excellent scalability and easy upgradability.
In today’s tutorial, we will learn how we can use Fargate with the EKS cluster to deploy the Kubernetes application easily. We will use private VPC to deploy the EKS Cluster more securely.
Prerequisites
To deploy and configure EKS clusters and AWS Fargate, you will need the following tools:
AWS CLI :- To interact with the AWS services from the command line, we need to install the AWS CLI. To install the AWS CLI, run the following command.
curl "https://awscli.amazonaws.com/awscli-exe-linux-x86_64.zip" -o "awscliv2.zip"
unzip awscliv2.zip
sudo ./aws/install
aws --version
Eksctl :- A command line tool to manage EKS clusters. To install eksctl command, run the following command.
curl --silent --location "https://github.com/weaveworks/eksctl/releases/latest/download/eksctl_$(uname -s)_amd64.tar.gz" | tar xz -C /tmp
sudo mv /tmp/eksctl /usr/local/bin
eksctl version
Kubectl :- A command line tool to manage Kubernetes clusters. To install kubectl run the following command.
curl -LO "https://dl.k8s.io/release/$(curl -L -s https://dl.k8s.io/release/stable.txt)/bin/linux/amd64/kubectl"
chmod +x kubectl
mv kubectl /usr/bin/
kubectl version
Deploy EKS Cluster
We will create a new Elastic Kubernetes Cluster named First with an associated Fargate profile in the ap-south-1 region. Creating a new Cluster may take up to 10 -20 mins to finish completely. To implement a more secure environment for Kubernetes, we can also deploy Kubernetes in a private VPC. Simply mentions “–vpc-cidr 10.0.0.0/16” at the end of the command to deploy the Kubernetes in a private VPC.
- To create the new EKS cluster on AWS, run the following command.
eksctl create cluster --name First --region ap-south-1 --fargate
The eksctl command used AWS CloudFormation in the background to create the EKS Cluster.
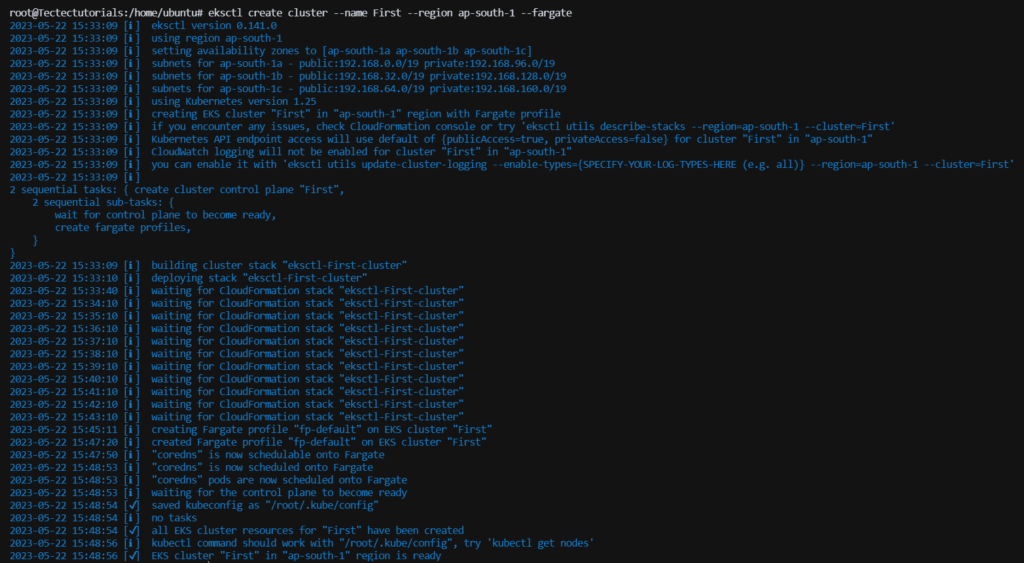
Using the above command, a cluster with the name First is created in the ap-south-1 region, along with a Fargate profile, which determines which pods will be run using Fargate.
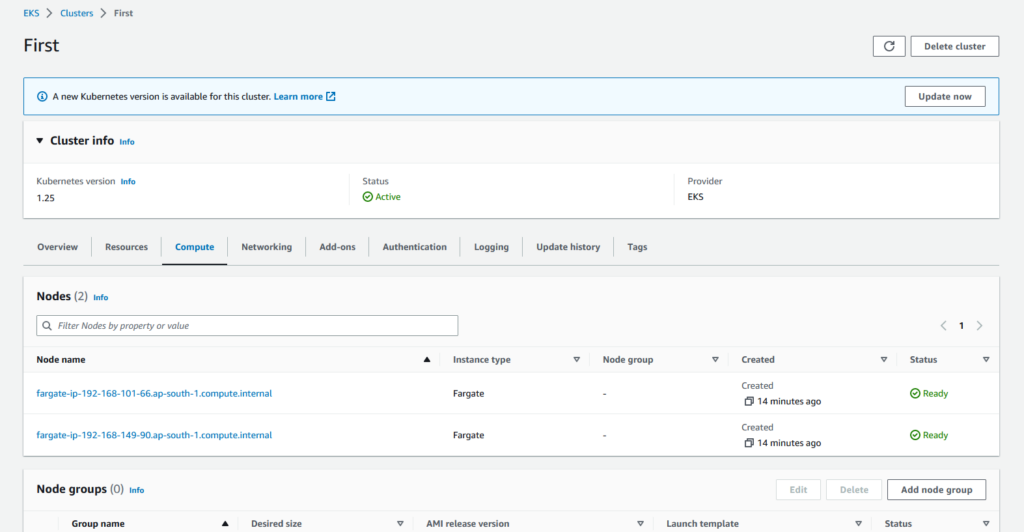
- To verify the EKS Cluster is successfully created from the command line, run the following command to list down the created EKS Cluster.
aws eks list-clusters --region ap-south-1

- To connect to the newly create EKS cluster, we need to create the kubeconfig file. Simply run the following command to create the kubeconfig file.
aws eks update-kubeconfig --name First --region ap-south-1
- Now, we can run any kubectl command to test the connectivity. Simply run the following command to check the all running pods in the Kubernetes cluster.
kubectl get pods -A

Deploy Demo App
Create a kubernetes-demo.yml file, Copy and paste the following data into the file.
apiVersion: apps/v1
kind: Deployment
metadata:
  name: demo-deployment
  namespace: default
  labels:
    app: kubernetes-demo
spec:
  replicas: 3
  selector:
    matchLabels:
      app: kubernetes-demo
  template:
    metadata:
      labels:
        app: kubernetes-demo
    spec:
      containers:
      - name: nginx
        image: nginx:latest
        ports:
        - containerPort: 80
---
apiVersion: v1
kind: Service
metadata:
  name: demo-service
  namespace: default
  labels:
    app: kubernetes-demo
spec:
  selector:
    app: kubernetes-demo
  ports:
    - protocol: TCP
      port: 80
      targetPort: 80
- Now deploy the kubernetes-demo.yml file in the Kubernetes Cluster.
kubectl apply -f kubernetes-demo.yml
- To check the status of the pods, run the following commands.
kubectl get pods

As you guys can see, we have successfully deployed the kubernetes-demo.yml file in the Kubernetes Cluster.
- Now describe any pods with the following command.
kubectl describe pod demo-deployment-78b8f68df5-2hkv7
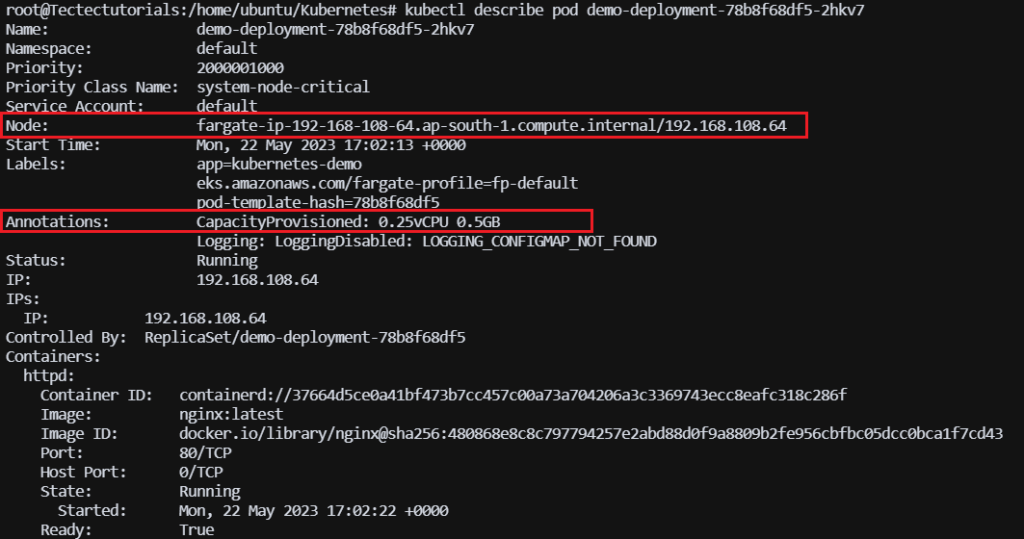
As we can see, the pod is deployed on the Fargate Node with 0.25vCPU and 0.5GB RAM.
- To check all the nodes of the EKS cluster, run the following command.
kubectl get nodes

Deploy the Demo App in a different Namespace
Earlier, we are using the default Namespace to deploy the Demo App. But if we have to deploy multiple applications in Kubernetes, then we need to deploy them in a different namespace instead of the default Namespace. Using different namespaces in a Kubernetes cluster ensures isolation and resource management, allowing multiple projects to coexist and operate independently within the same cluster.
- We will create a Namespace named demo with the following command.
kubectl create namespace demo
- Now, we need to create a Fargate profile for the Namespace. Run the following command to create the Fargate Profile from the command line.
eksctl create fargateprofile --cluster First --name demo_fargate_profile --namespace demo

Note:- For every Namespace, we have to create a separate Fargate Profile. Without Fargate Profile, we cannot deploy the Applications in the Namespace on Kubernetes (EKS) on AWS Fargate. It specifies which namespaces and Kubernetes labels should be mapped to Fargate for automatic deployment of pods.
- Change the Namespace from default to demo in the kubernetes-demo.yml file, and then deploy it with the following command.
kubectl apply -f kubernetes-demo.yml
- Now check the pods in the demo Namespace with the following command.
kubectl get pods -n demo

Delete the Demo App
To delete all the pods and services created by the demo app, simply run the following command.
kubectl delete -f kubernetes-demo.yml
Delete the EKS Cluster
To delete an EKS (Elastic Kubernetes Service) cluster, we can use the AWS Management Console or command-line tools like AWS CLI. To delete the EKS from the command line, run the following command.
eksctl delete cluster First --region ap-south-1
Conclusion
Serverless Kubernetes pod deployment in AWS EKS and Fargate offers several advantages, especially in burst scenarios when scaling EKS clusters may be problematic. The Amazon EKS resource can be provisioned, managed, and deployed in a variety of ways using EKS commands, Kubectl commands, and AWS commands.
In today’s tutorial, we have how to deploy Elastic Kubernetes Service (EKS) with AWS Fargate to run Kubernetes in a serverless mode. If you guys have any questions or queries, then let me know in the comments section.











Leave a Reply
View Comments