


The FASTPANEL is a free and powerful server management tool that enables you to create, manage and backup your sites in just a few clicks. However, since it is extremely simple, it runs a lot faster than other server management panels. You can also set access rights according to your preferences – each site can be assigned to a specific user.
Features:-
- Host and manage sites
- Create and manage Mail accounts
- Create and manage FTP account
- Database Management
- Firewall management
- Backup System
- SSL Certificates
- Cron Task Wizard
- Load Statistics
- Manage different PHP versions
Operating System:-
The list of operating systems that Fastpanel supports.
| Operating System | Version |
|---|---|
| Debian | 8, 9, 10, 11 (64-bit) |
| Ubuntu | 18.04, 20.04 (64-bit) |
| AlmaLinux / Rocky Linux | 8 (64-bit) |
| CentOS | 7 (64-bit) |
Also Read :- How to install Plesk Control Panel on CentOS 7
Prerequisites
- Fresh server with Ubuntu 20.04 operating system
- Access of Root user or other users with Sudo privileges
- Minimum 1 GB of RAM required with 2 GB of the Swap file
- A minimum of 10 GB of free space is required
Set a fully qualified Hostname
Panel installation requires a fully qualified hostname on the server. To set a fully qualified hostname, run the following command.
sudo hostnamectl set-hostname server.domain.com
Update the Server
We need to update all the repositories and packages on the server with the following command.
sudo apt update -y
Install pre-required packages
Before starting the installation process, we need to install some pre-required packages. Run the following command to install the pre-required packages.
sudo apt install vim screen wget curl -y
Create the Swap file
The swap file is an important part of panel installation. When the server runs out of memory at that time, the swap file works as a temporary memory to overcome the load of RAM. The Swap file is always double in the size of RAM. Create the swap file as mentioned in the below table.
| RAM | SWAP FILE |
|---|---|
| 1 GB | 2 GB |
| 2 GB | 4 GB |
| 4 GB | 4 GB |
- Run the following command to check the server’s RAM.
sudo free -h
- Allocate the free space for the swap file with the following command.
sudo dd if=/dev/zero of=/swapfile count=2048 bs=1M
For this tutorial, we are using the server with 1 GB RAM. So, we have created 2 GB of the swap file. Create the swap file according to your server’s RAM.
- Now change the Ownership of the swap file with the following command.
sudo chown root:root /swapfile
- Change the permission of the swap file to avoid any type of modification.
sudo chmod 0600 /swapfile
- Setup the swap file which we have created.
sudo mkswap /swapfile
- Run the following command to enable the swap file.
sudo swapon /swapfile
- After enabling the swap file, we need to make the swap permanent. Otherwise, the swap file will automatically be removed from the server after reboot. To make it permanent, edit and add some lines in /etc/fstab file. To edit, run the following command.
sudo vim /etc/fstab
- Copy and paste the following data into the /etc/fstab file.
/swapfile swap swap defaults 0 0
- Verify the above entries with the following command.
sudo mount -a
- Now set the swappiness value to 10 with the following command.
sudo sysctl vm.swappiness=10
- To make swappiness permanent, open the /etc/sysctl.conf in edit mode and add some lines to it. To open the /etc/sysctl.conf in edit mode, run the following command.
sudo vim /etc/sysctl.conf
- Add the following data in /etc/sysctl.conf file.
vm.swappiness=10
FastPanel Installation
To avoid any type of interruption, run the installation script in the screen session. Run the following command to open the screen session.
sudo screen
Download and execute the FastPanel installation script with the following command.
wget http://repo.fastpanel.direct/install_fastpanel.sh -O - | bash -
When the installation script got completed, you will get the login details for the Panels like this.

Login to FastPanel
Enter the following URL in the browser to access the login page of FastPanel.
https://server_ip:8888
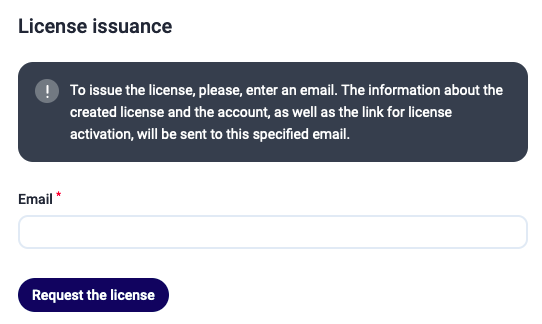
For the first time, it will ask for the Mail account to issue the license of FastPanel. Enter the mail account and then click on the Request the license button.
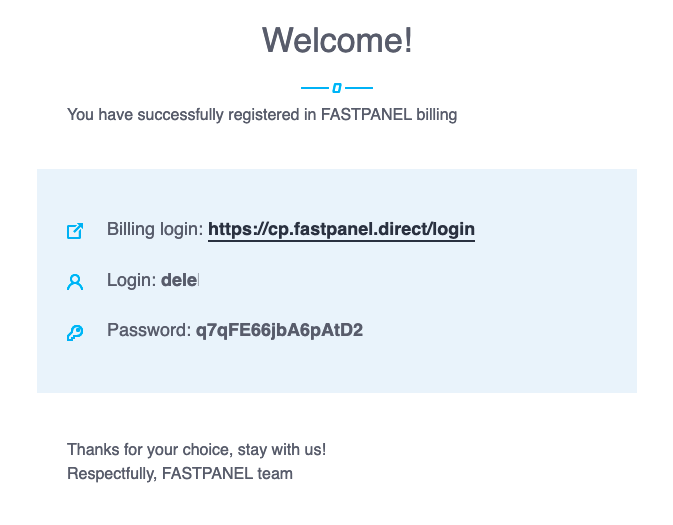
On your mail account, you will receive a mail like this. Simply click on the link and log in with the details which you have received.
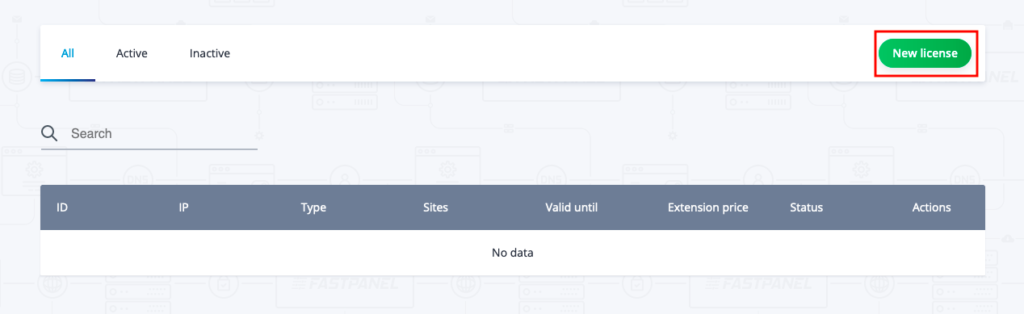
After login, click on the New license button.
Click on Add to cart button.

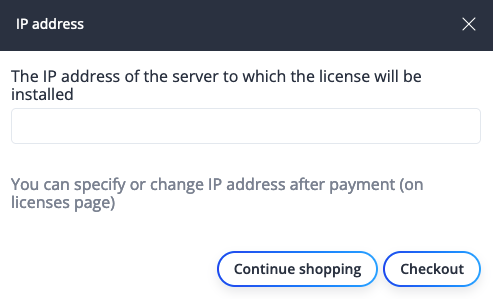
Enter the server’s public IP address and then click on the Checkout button. Now, click on the Checkout button.
Click on the key button and copy the Activation key.

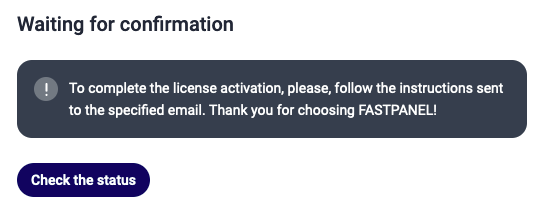
Switch to the Plesk login page and click on the Check the status button. Paste the activation key and click on the Request the license button.
Now finally, log into the FastPanel by entering the user and password which you have received from the installation script.

Conclusion
In today’s tutorial, we have learned about the FastPanel and its features. FastPanel is one of the popular free panels which offers a variety of offers such as Load Statistics, SSL certificates, etc. We have also learned how we can install and configure the FastPanel on Ubuntu 20.04.
If you have any questions or queries, let me know in the comment section.