


pgAdmin is an open-source tool which offers varieties of features to manage the PostgreSQL, one of the most powerful open-source relational database systems. Its user-friendly graphical platform facilitates the manipulation, management, and seamless interaction with PostgreSQL databases. pgAdmin is compatible with a wide array of operating systems, including Linux distributions like Ubuntu, Debian, and CentOS, as well as Windows and Mac systems.
Key features of pgAdmin:
- Database Management: It allows users to create, delete and modify databases, tables, views, indexes, and other database objects in the PostgreSQL.
- Query Tool: Offers an easy-to-use SQL editor to execute queries, observe query outcomes, and examine database information.
- Server Administration: Enables users to manage, configure and monitor the server activities as well as server settings.
- Data Manipulation: Allows user to easily import and export data, also allowing seamless data transfer between different database sources.
- Visual Tools: Enables visual design of database structures, simplifying the process of creation and modification of tables, relationships, and views.
- Security Management: Facilitates user and group management, granting control over access permissions to databases and objects.
- Extensions and Plugins: Enables expansion of functionalities through diverse plugins and extensions, enriching user experience and expending the capabilities.
In today’s tutorial, we will learn how we can configure the pgAdmin with both Nginx and Apache.
Also Read: Install RabbitMQ Server on Ubuntu 23.10
Prerequisites
- Linux based Server (Ubuntu 23.10).
- Access of Root or Sudo user.
- PostgreSQL must be installed on the server to connect the pgAdmin with localhost.
Install pgAdmin and dependencies on Ubuntu 23.10 with Nginx
To configure the pgAdmin with Nginx, follow the below simple and easy steps.
- Update the server repository with the help of apt built-in command line utility.
sudo apt update
- Before proceeding for installation, we need to install some prerequisites packages on the server.
sudo apt install libgmp3-dev libpq-dev build-essential libssl-dev libffi-dev python3-dev python3-venv nginx -y
- To store the pgAdmin data, we need to create some directories.
sudo mkdir -p /var/lib/pgadmin4/sessions
sudo mkdir /var/lib/pgadmin4/storage
sudo mkdir /var/log/pgadmin4
sudo mkdir /pgadmin
- Change your current directory to the newly created pgadmin directory and activate the python environment.
cd /pgadmin
python3 -m venv pgadmin_env
- Activate the python environment with the following command.
source /pgadmin/pgadmin_env/bin/activate
- Upgrade the Pip package of the python.
python -m pip install -U pip
- Download the latest pgAdmin python package with the following command.
wget https://ftp.postgresql.org/pub/pgadmin/pgadmin4/v8.1/pip/pgadmin4-8.1-py3-none-any.whl
Note:- If the above throws 404 error, then it means the package we are trying to download is removed. As pgAdmin packages are keep on updating, then you can directly download the latest pgAdmin python package by visiting their official page pgAdmin python.
- Now configure and install the downloaded package with the help of Pip command line utility.
python -m pip install wheel
python -m pip install pgadmin4-8.1-py3-none-any.whl
- Install the Gunicorn package to run the pgAdmin.
python -m pip install gunicorn
Configure the pgAdmin with Nginx on Ubuntu 23.10
- Create a file named as config_local.py to define the stoage and logs path to the pgAdmin
vim /pgadmin/pgadmin_env/lib/python3.10/site-packages/pgadmin4/config_local.py
- Copy and paste the following lines in the file.
LOG_FILE = '/var/log/pgadmin4/pgadmin4.log'
SQLITE_PATH = '/var/lib/pgadmin4/pgadmin4.db'
SESSION_DB_PATH = '/var/lib/pgadmin4/sessions'
STORAGE_DIR = '/var/lib/pgadmin4/storage'
AZURE_CREDENTIAL_CACHE_DIR = '/var/lib/pgadmin4/azurecredentialcache'
SERVER_MODE = True
Save and exit from the file.
- Configure the pgAdmin on Ubuntu 23.04 with the following command.
source /pgadmin/pgadmin_env/bin/activate
python /pgadmin/pgadmin_env/bin/pgadmin4 -m server --setup-dir /etc/pgadmin4

Create a mail and password to login into the pgAdmin. After creating the mail and password stop the process with the CTRL + C.
- To run it properly, we need to configure the above command into a Linux based service.
sudo tee /etc/systemd/system/pgadmin4.service <<EOF
[Unit]
Description=pgAdmin4 web server
After=network.target

[Service]
User=root
Group=root
WorkingDirectory=/pgadmin
Environment="PATH=/pgadmin/pgadmin_env/bin:$PATH"
ExecStart=/pgadmin/pgadmin_env/bin/python /pgadmin/pgadmin_env/bin/pgadmin4 -m server --setup-dir /etc/pgadmin4

[Install]
WantedBy=multi-user.target
EOF
- Reload the systemd to read and configure the newly created service file.
sudo systemctl daemon-reload
- Start the pgAdmin service
sudo systemctl start pgadmin4
- Enable the pgAdmin service. So that, It can automatically get started in the case of server reboot.
sudo systemctl enable pgadmin4
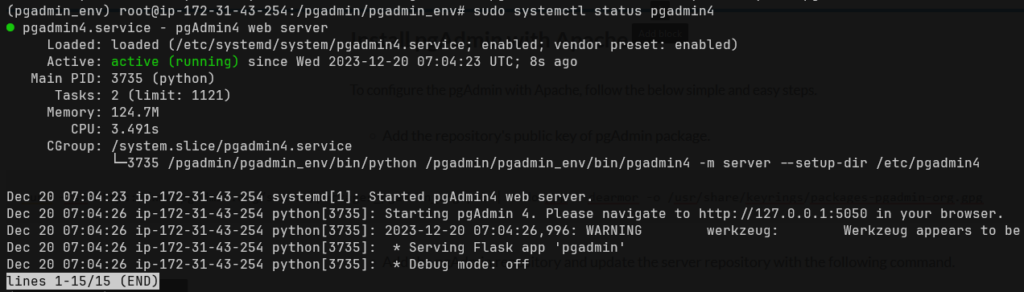
- Check the status of the service with the following command.
sudo systemctl status pgadmin4
- Configure the Nginx virtual to run the pgAdmin on the server_ip.
server {
    listen 80;
    server_name _;

    location / {
        proxy_pass http://127.0.0.1:5050;
        proxy_set_header Host $host;
        proxy_set_header X-Real-IP $remote_addr;
        proxy_set_header X-Forwarded-For $proxy_add_x_forwarded_for;
        proxy_set_header X-Forwarded-Proto $scheme;
    }
}
- Check the syntax of the Nginx virtual host.
sudo nginx -t
- If the syntax is OK then restart the Nginx service.
sudo systemctl restart nginx
- To access the pgAdmin Dashboard, enter the server IP in the URL section of the browser.
http://Server_IP

Install pgAdmin with Apache on Ubuntu 23.10
To configure the pgAdmin with Apache, follow the below simple and easy steps.
- Add the repository’s public key of pgAdmin package.
curl -fsS https://www.pgadmin.org/static/packages_pgadmin_org.pub | sudo gpg --dearmor -o /usr/share/keyrings/packages-pgadmin-org.gpg
- Add the pgAdmin repository and update the server repository with the following command.
sudo sh -c 'echo "deb [signed-by=/usr/share/keyrings/packages-pgadmin-org.gpg] https://ftp.postgresql.org/pub/pgadmin/pgadmin4/apt/$(lsb_release -cs) pgadmin4 main" > /etc/apt/sources.list.d/pgadmin4.list && apt update'
- Install the pgAdmin package
sudo apt install pgadmin4 -y
- Setup the pgAdmin
sudo /usr/pgadmin4/bin/setup-web.sh
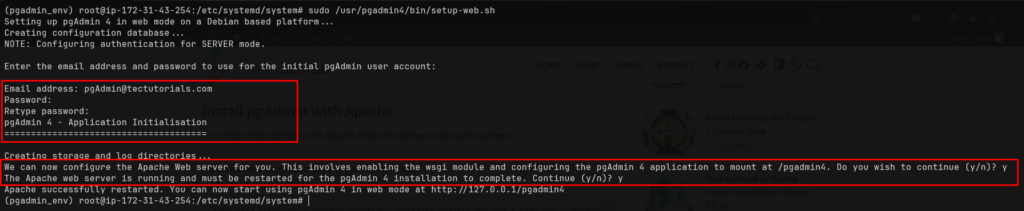
Create Mail and password for the pgAdmin login and then enter “y” to create Apache virtual host and restart the Apache service.
- To access the pgAdmin Dashboard, enter the following URL with your server IP.
http://Server-IP/pgadmin4
Conclusion
Setting up pgAdmin on Ubuntu 23.10 is a very simple and straightforward process, ensuring seamless management of PostgreSQL databases with the help of the user-friendly pgAdmin interface. If you guys have any queries and question then please share your queries in the comment section.