


SSH key-based authentication is used as an additional layer of security for remote system access using a Public key. The concept of public-key encryption was established in 1975 by Whitfield Diffie and Martin Hellman.
SSH key-based authentication works with two keys, private and public keys. The private key is stored on the host where the SSH client is working, while the public key is stored on the SSH server.
Setting Up Key-based Authentication
Setting up of SSH key-based authentication consists of four phases, which may be described as follows:
- Generate the SSH Key Pair
- Install the SSH Public Key to Your Server
- Connect to the Server with an SSH key
- Disable the Password Authentication
- Enable Password-based Authentication for a specific user
- Enable Password-based Authentication for the Root user
Prerequisite
- Server with Ubuntu 20.04 operating system
- Root user or another user with Sudo privileges
Generate the SSH Key Pair
Create the SSH key on the client with the following command.
sudo ssh-keygen
Enter the file in which to save the key (/root/.ssh/id_rsa): – Enter a name for the key, if you don’t want to give any name then simply skip this step by pressing the Enter button. By default, it will assign id_rsa as the key name.
Enter passphrase (empty for no passphrase): – Enter a password for the key, then press Enter button and again enter the same password. If you don’t want to protect the key with a password, then simply skip this step by pressing the Enter button.
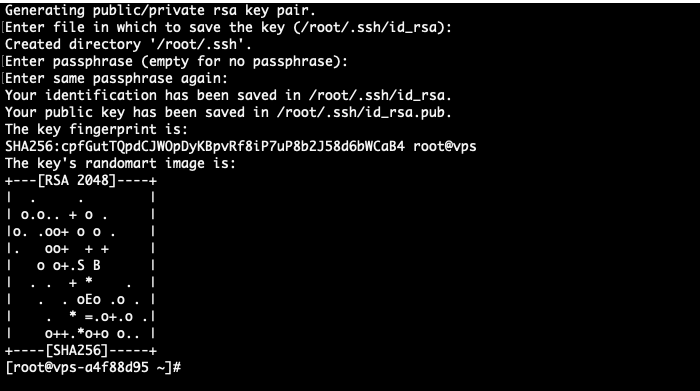
The ssh-keygen command will generate two keys, private (id_rsa) and public (id_rsa.pub) keys.
Install the SSH Public Key to Your Server
To configure the SSH key on the server, we need to upload the SSH public key on the server. We have multiple ways to upload the public key on the server.
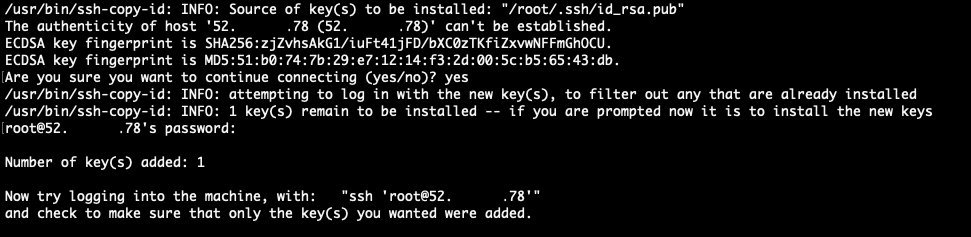
Install Public key with ssh-copy-id
The ssh-copy-id tool by default installed in many operating systems. If your operating system does not have the ssh-copy-id tool, then you need to use the second option. To use the ssh-copy-id tool, you must have password-based SSH authentication access.
- Run the following command to use the ssh-copy-id tool.
ssh-copy-id user@server_ip
“Are you sure you want to continue connecting (yes/no)?” :- Type yes and press the Enter button to save the Fingerprint.
“User@server_IP password”:– Now enter the password of the server.
Install the Public key with SSH
If the ssh-copy-id tool now works for you, then we can copy the Public key with SSH on the server.
- Run the following command to copy the public key with the ssh command. The below command will take the public key from the default path (~/.ssh/id_rsa.pub). If you want to add any other public key on the server, then replace the default path with the path of your public key.
cat ~/.ssh/id_rsa.pub | ssh user@server_ip "mkdir -p ~/.ssh && touch ~/.ssh/authorized_keys && chmod -R go= ~/.ssh && cat >> ~/.ssh/authorized_keys"
“Are you sure you want to continue connecting (yes/no)?” :- Type yes and press the Enter button to save the Fingerprint.
“User@server_ip password:” – Now enter the password of the server.

Connect to the Server with the SSH key
We have successfully configured the SSH key-based authentication on the server. Now it’s time to test the SSH key-based authentication.
- To log into the server, run the following command with the server’s user and server’s IP
ssh user@server_ip
- If you have added another key, then you need to mention the path of your key. Because the SSH command by default searches the public ssh key in the .ssh directory inside the Home directory of the user.
ssh user@server_ip -i path/of/key
Now, this time it will not prompt for the password. We will directly log into the server without entering the password.
Disable the Password Authentication
As we have successfully setup the SSH key-based authentication on the server, now we did not require the Password-based Authentication on the server. To disable the password-based Authentication, follow the below steps.
- Open the /etc/ssh/sshd_config file in edit mode with the following command.
sudo vim /etc/ssh/sshd_config
- Search for the line “PasswordAuthentication” in the file. This line may be commented with the “#” symbol. Uncomment the line by removing “#” and setting the value to no. Sometimes this line may not be commented, in that case, you only need to change the value from yes to no.
The output will look like this.

- Restart the SSH service with the following command.
sudo systemctl restart ssh
- Before you close your current session, open a new terminal window and test that the SSH service is functioning correctly by logging into the server.
ssh user@server_IP
After successfully testing the SSH service, you can close the other terminal session.
Enable Password-based Authentication for a specific user
Sometimes we need to allow a specific user to log in with Password-based Authentication. To allow Password-based Authentication only for a specific user, follow the below steps.
- Open the /etc/ssh/sshd_config file in edit mode with the following command.
sudo vim /etc/ssh/sshd_config
- Add the following line at the end of the /etc/ssh/sshd_config file.
Match User <username>
PasswordAuthentication yes
Match all
- Restart the SSH service with the following command.
sudo systemctl restart ssh
Enable Password-based Authentication for the Root user
Due to security reasons, some servers by default disable the Password-based Authentication for the Root user. To allow the Password-based Authentication only for the Root user, follow the below steps.
- Open the /etc/ssh/sshd_config file in edit mode with the following command.
sudo vim /etc/ssh/sshd_config
- Now search for the line “PermitRootLogin“. This line may be commented with the “#” symbol. Uncomment the line by removing “#” and setting the value to yes. Sometimes this line may not be commented, in that case, you only need to change the value from no to yes to allow the root user to log in with password-based Authentication. The output will look like this.

- Add the following line at the end of the /etc/ssh/sshd_config file.
Match User root
PasswordAuthentication yes
Match all
- Now restart the SSH service with the following command.
sudo systemctl restart ssh
Conclusion
In this tutorial, we have learned about the SSH keys and how we can setup the SSH key-based authentication on the Ubuntu 20.04. We have also learned how we can allow the Root user or any specific user to use Password-based authentication.
If you guys have any queries and questions related to this tutorial, then let me know in the comments section.