


Linux is one of the most popular and useful operating systems. Linux is a multi-user-based operating system that can be accessed by multiple users simultaneously. The server mostly uses Linux as the main operating system. Due to the multi-user concept, several security issues arise, such as an unauthorized or malevolent user can damage, edit, or delete sensitive data.
From the security point of view, the authorization is divided into 2 levels
- Permission
- Ownership
In today’s tutorial, we will learn what is the importance of Permission and Ownership and how we can modify Permission and Ownership on Linux.
Linux File Ownership
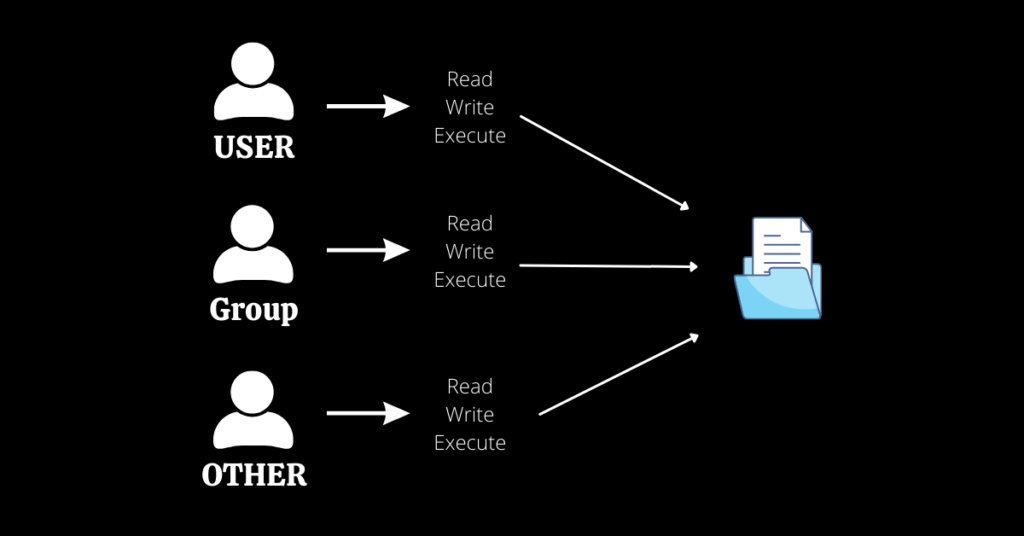
Every directory and file is assigned 3 types of owners on Linux.
- User – The user is the person who created the file or the directory. The user is also known as the Owner.
- Group – Every user on Linux have its own group with the same name. We can assign a User in multiple groups. All the users inside the group share the same permissions. For example, you need to assign read permission to some users. You can add all these users in a group and then assign read permission to that group. Now all the users inside that group have read permission.
- Other – Other is referred to as Any other user who is not the owner of the file or directory and does not belong to the user’s group of the file or directory. When the owner set the permission for others, that means any user has access to that particular permission. For example, If the owner has assigned read permission for Other, then anyone can read that file without any restriction.
Linux File Permission
Every directory and file is assigned with 3 types of permission for all the 3 owners on Linux.
- Read – Read permission is used to read the content of the file. Read permission on the directory allow you to list all the files. It is denoted by “r” by the character and “4″ when a number defines it.
- Write – Write permission is used to write and append data from files. Write permission on a directory that allows you to create, delete and rename files stored in the directory. It is denoted by “w” by the character and “2” when a number defines it.
- Execute – Execute permission is used to execute any file only. It is denoted by “x” by the character and “1” when a number defines it.
Check Permission
Run the following command to check the permission of Files and Directories of the current directory.

As per the above image, The first section defines the Permissions. In the first section, there are 10 bits, the first bit indicates the folder or file or symbolic link. The directory is indicated by “d”, the file is indicated by “-” and the symbolic link is indicated by “l”. The next 9 bits indicate the permission for User, Group and Other respectively.

Change permission
chmod stands for change mode. chmod command is used to change the permission of User, Group and Other. The syntax of chmod is as follows.
Syntax
chmod [Permission][Path of folder or file]
We can use the chmod command in 2 ways –
- Absolute mode
- Symbolic mode
Absolute (Numeric) Mode –
In this mode, permission is represented in numeric form. The following tables show the permissions with their permissions types.
| Number | Symbol | Permission Type |
|---|---|---|
| 0 | — | No Permission |
| 1 | –x | Execute |
| 2 | -w- | Write |
| 3 | -wx | Execute + Write |
| 4 | r– | Read |
| 5 | r-x | Read + Execute |
| 6 | rw- | Read +Write |
| 7 | rwx | Read + Write +Execute |
For example, change the permission of the directory to 766.
sudo chmod 766 Download
Before

After

Symbolic Mode –
In this mode, you can modify the permissions of a specific owner by using mathematical symbols.
| Operator | Description |
|---|---|
| + | To add the permission to the directory or file. |
| – | To removes the permission from the directory or file. |
| = | Sets the permission and overrides the permissions set earlier. |
Owners are represented as follows –
| User | Description |
|---|---|
| u | User |
| g | Group |
| o | Other |
For example –
- We have 3 directories with the following permissions.

chmod o=rw- Download
Permission of Others is changed from rwx to rw.

- To add the read permission to Group.
chmod g+r Download
- To remove the write permission from the User.
chmod g-w Download
Change the Ownership and Group
chown command stands for change ownership. chown command is used to change the ownership of User and Group both.
Syntax –
chown user:group [Path of folder or file]
- For example, we need to change the ownership of the user and group to www-data.
sudo chown www-data:www-data /var/www/html
- To apply the same ownership of all the files and directories in html, then use the above command with the -R attribute.
sudo chown -R www-data:www-data /var/www/html
chgrp command
If you want to change the ownership of the Group only, then use the following command.
Syntax –
chgrp Group_name [Path of folder or file]
- For example, change the group to Ubuntu.
sudo chgrp ubuntu /var/www/html
- To apply the same ownership of all the files and directories in html, then use the above command with the -R attribute.
sudo chgrp -R ubuntu /var/www/html
Conclusion
In this tutorial, we have learned what is permission and ownership and how we can modify the ownership and permission of the Directories/files. We have explained all these terms with examples.
If you guys have any queries, let me know in the comments section.