

LAMP (Linux, Apache, MySQL, and PHP) is a development framework that is open-source that uses Linux as an operating system, Apache as a Web Server to server the content, MySQL as a database server, and PHP as a server-side scripting language.
- Linux – Linux is one of the popular operating systems. Linux is the first layer of LAMP. It offers a very flexible environment where users can customize the configuration as per their requirements.
- Apache – Apache is the mostly used web server on the planet. Apache is the second layer of LAMP. Apache web server is used to serve the content of multiple websites from a single server. It accepts the request and sends the data across the Internet using the HTTP protocol.
- MySQL – MySQL is a database server. MySQL is the third layer of LAMP. It stores the data in table structure and these tables stores the data in the form of row and column. MySQL stores data that can be queried anytime by scripting to construct a website or application.
- PHP – PHP is the scripting layer. PHP stands for Hypertext Preprocessor. Most developers prefer PHP to build dynamic applications and websites. PHP based websites and applications are fast as compared to other languages.
In today’s tutorial, we will learn how to setup LAMP on CentOS 7.
Prerequisites
- CentOS 7 Operating System
- Root user or another user with Sudo privileges
Update the server Packages and Repositories
Before starting the LAMP setup, we need to update all the repositories so that we can download and install the latest packages. To update the server, run the following command.
sudo yum update -y
Apache
We already have a running CentOS 7 Linux server. Now, the next step of the LAMP setup is to install Apache. Apache is a web server that is used to serve the content of a website and application.
- To install the Apache package on the server, run the following command.
sudo yum install httpd -y
- Now start the Apache service with the following command.
sudo systemctl start httpd
- Now check the status of the Apache service.
sudo systemctl status httpd
MySQL (MariaDB)
After Apache installation, the next step is to install and configure the MySQL server on the CentOS 7. MySQL is a relational database management system that is used to create and manage Databases. MySQL stores the data in the table form made up of rows and columns.
To install the MariaDB 10.4 follow the below steps.
- First, we need to add the MariaDB Repository on the server with the following command.
vim /etc/yum.repos.d/MariaDB.repo
- Enter the following content in the file and then Save and Exit from the file.
# MariaDB 10.4 CentOS repository list
# http://downloads.mariadb.org/mariadb/repositories/
[mariadb]
name = MariaDB
baseurl = http://yum.mariadb.org/10.4/centos7-amd64
gpgkey=https://yum.mariadb.org/RPM-GPG-KEY-MariaDB
gpgcheck=1
- Run the following command to install MySQL.
yum install MariaDB-client MariaDB-server -y
- Now start the MySQL service with the following command.
sudo systemctl start mariadb
- Now check the status of the MySQL service.
sudo systemctl status mariadb
- Run the following command to configure MySQL with the secure_installation command.
sudo mysql_secure_installation
After executing the above command, we need to configure MySQL as per the following settings.
- Enter current password for root (enter for none)– Press Enter button
- Switch to unix_socket authentication [Y/n] – Press N
- Change the root password? [Y/n]– Y
- New password: – Enter a strong password
- Re-enter new password: – Again, enter the same password
- Remove anonymous users? [y/n] – Press Y
- Disallow root login remotely? [y/n] – Press Y
- Remove test database and access to it? [y/n] – Press Y
- Reload privilege tables now? [y/n] – Press Y
PHP
Now the next step is to install the PHP. PHP is a server-side scripting language that is used by most developers to develop PHP-based applications and websites. In this tutorial, we will use PHP 8.1 for the installation.
- First, we need to enable the Remi Repository. Run the following command to enable the repository on the CentOS server.
yum install -y https://rpms.remirepo.net/enterprise/remi-release-7.rpm
- Run the following command to install PHP 8.1 with their mostly used modules.
yum install php81-php php81-php-opcache php81-php-xml php81-php-hash php81-php-mysqlnd php81-php-mbstring php81-php-ldap php81-php-curl php81-php-imap php81-php-zip php81-php-json php81-php-mysqli php81-php-intl php81-php-gd php81-php-fpm php81-php-cli php81-php-imagick php81-php-zlib -y
- Now we need to update the Apache to work with PHP, we need to restart the Apache service.
sudo systemctl restart httpd
Test PHP Processing
After installing PHP 8.1, now we need to test whether the Apache is working with PHP or not. To test, we need to create a PHP info file in the default document root(/var/www/html).
- Before testing the PHP processing, we need to disable the CentOS default firewall (SELinux). To disable the SELinux firewall, run the following command.
setenforce 0
sed -i 's/enforcing/disabled/' /etc/sysconfig/selinux
- Remove the default demo page.
rm -rf /var/www/html/index.html
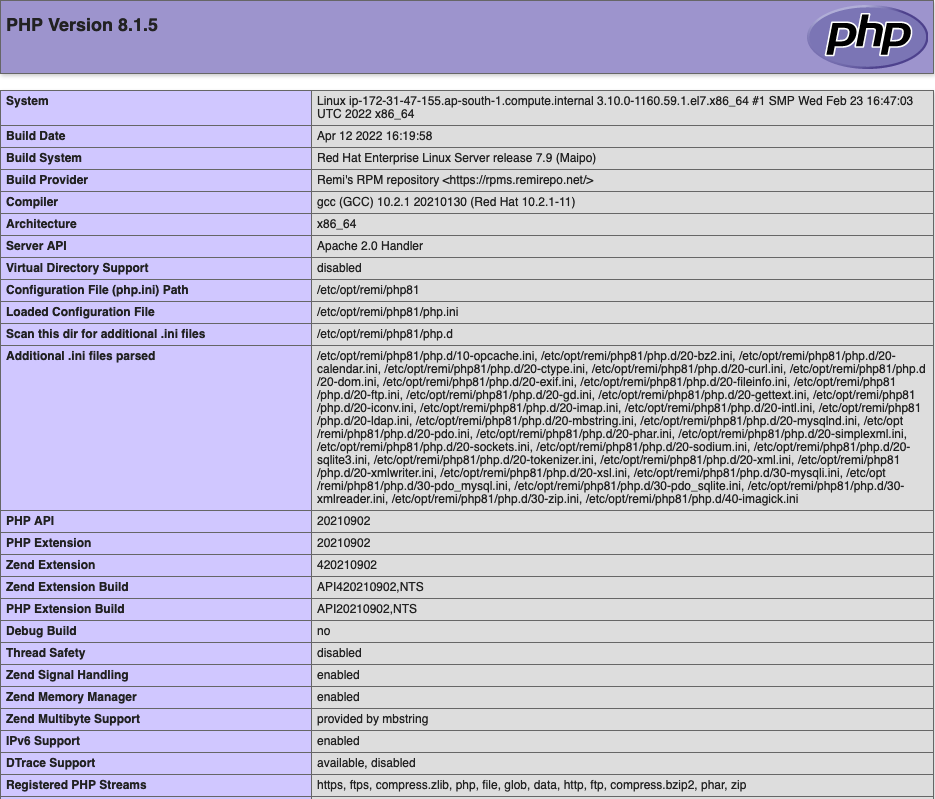
- Create the PHP info file with the following command.
sudo vim /var/www/html/index.php
- Copy and paste the following content into the index.php file.
<?php
phpinfo ();
?>
- Enter the server’s public IP address on the browser, you will get similar output like this.
Conclusion
In this tutorial, we have learned about the LAMP and how we can easily setup the LAMP on CentOS 7. LAMP stands for Linux, Apache, MySQL, and PHP. LAMP is a development framework that uses Linux as an operating system, Apache as a Web Server to server the content, MySQL as a database server, and PHP as a server-side scripting language.
If you guys have any queries, let me know in the comments sections.