


LAMP stands for Linux, Apache, MySQL, and PHP. It is a Web development platform that uses Linux as an operating system, Apache as a Web Server, MySQL as a Relational Database Management System and PHP as a server-side scripting language.
- Linux – Linux is one of the popular operating systems which offers more flexibility and allows users to customize the configuration as per the requirement.
- Apache – Apache is one of the famous and mostly used web servers to serve the content of any type of website and application. We can run multiple websites and applications with different virtual hosts.
- MySQL – MySQL is a relational database management system. MySQL stores the data in the table format and these tables stores the data in the form of row and column.
- PHP – PHP stands for Hypertext Preprocessor. It is one of the most used languages for the development of applications and websites. PHP based websites and applications are fast and reliable as compared to other languages.
In today’s tutorial, we will learn how to setup LAMP on Ubuntu 20.04, you can also use the same tutorial for the LAMP setup on Ubuntu 18.04.
Prerequisites
- Root user or another user with Sudo privileges
- Ubuntu 18.04 / Ubuntu 20.04 Operating system
Update the server Repositories and Packages
We need to update all the repositories to install the latest packages. To update the repositories, run the following command.
sudo apt update -y
Apache
We already have a running Ubuntu Linux server. Now, the next step of LAMP setup is to install Apache.
- Run the following command to install the Apache.
sudo apt install apache2 -y
- Now we need to start the Apache service, To restart the Apache service run the following command.
sudo systemctl start apache2
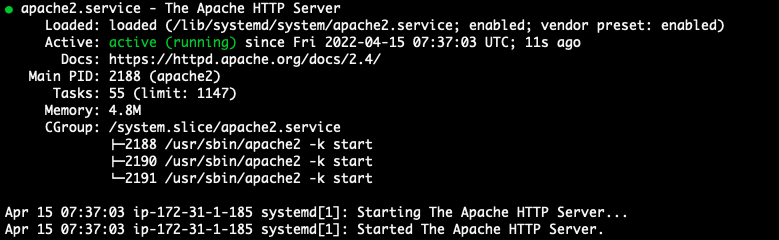
- Run the following command to check the status of the Apache service.
sudo systemctl status apache2
- If the Firewall is in the Active state, then you need to allow the Apache ports from the firewall.
sudo ufw allow in "Apache"
MySQL
After configuring the Apache, the next step is to install and configure MySQL. In this LAMP setup, we will use MySQL 8.0
- To download the MySQL package, we need to install the wget command.
sudo apt install wget -y
- Download MySQL 8.0 with the wget command.
wget https://dev.mysql.com/get/mysql-apt-config_0.8.12-1_all.deb
- Now, add the package you just downloaded to the repository with the following command.
sudo dpkg -i mysql-apt-config_0.8.12-1_all.deb
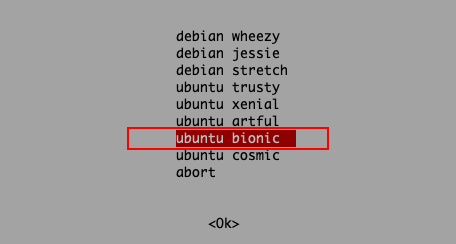
- Select the Ubuntu Bionic option from the Dialog Box.
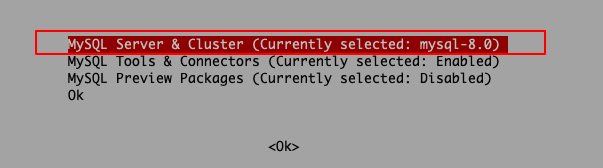
- Select MySQL 8.0 and then select OK. Now press the Enter Button.
- Update the server repositories with the following command.
sudo apt update -y
- Run the following command to install MySQL 8.0.
sudo apt install mysql-server -y
- Start the MySQL service with the following command.
sudo systemctl start mysql
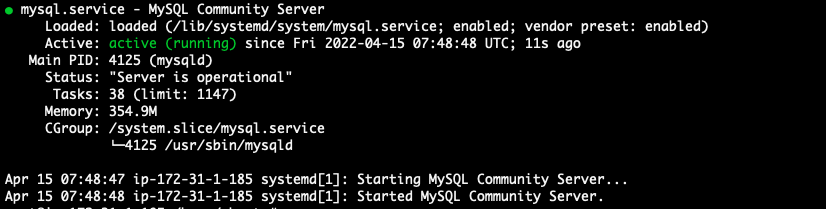
- Check the status of MySQL with the following command.
sudo systemctl status mysql
- Now secure the MySQL with the mysql_secure_installation command.
sudo mysql_secure_installation
Configure MySQL as per the given settings.
- VALIDATE PASSWORD component? [y/n] – Press N
- New password: – Use a strong password
- Re-enter new password: – Again, enter the same password
- Remove anonymous users? [y/n] – Press Y
- Disallow root login remotely? [y/n] – Press Y
- Remove test database and access to it? [y/n] – Press Y
- Reload privilege tables now? [y/n] – Press Y
PHP
PHP installation is the last step of LAMP setup. In this tutorial, we will use PHP 8.1 for the LAMP setup.
- Enable the Repository on the server with the following command.
sudo apt install software-properties-common
sudo add-apt-repository ppa:ondrej/php -y
- Update the server repositories.
sudo apt update -y
- Run the following command to install the PHP 8.1 with their mostly used modules.
apt install php8.1 php8.1-opcache php8.1-xml php8.1-mbstring php8.1-ldap php8.1-curl php8.1-imap php8.1-zip php8.1-mysqli php8.1-intl php8.1-gd php8.1-cli php8.1-imagick libapache2-mod-php8.1 -y
- Restart the Apache service so that Apache can work with PHP.
sudo systemctl restart apache2
Test PHP Processing
After installing PHP 8.1, now we need to check whether the PHP is properly working with Apache or not. To check, we need to create an index.php file in the default Document Root (/var/www/html).
- First, we need to remove the default index.html page with the following command.
rm -rf /var/www/html/index.html
- Run the following command to create the info file.
sudo vim /var/www/html/index.php
- Enter the following content in the index.php file.
<?php
phpinfo ();
?>
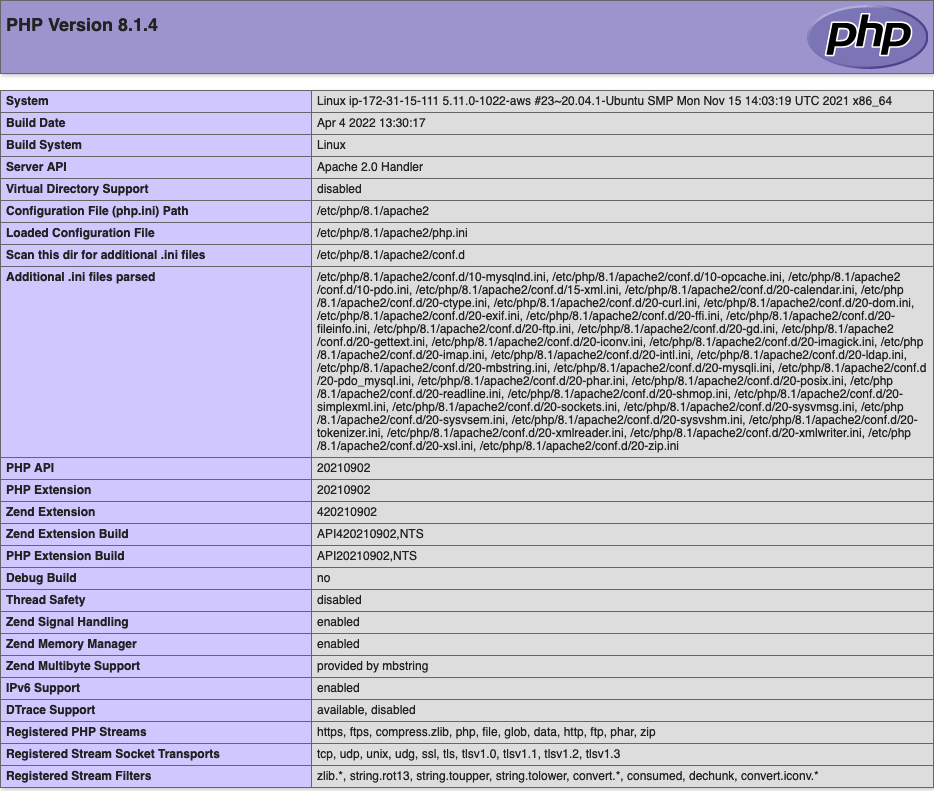
- Now enter the server’s public IP address on the browser. You will get a similar output as mentioned below.
Conclusion
In this tutorial, we have learned about the concept of LAMP, and how we can setup LAMP on Ubuntu 20.04. You guys can use the same tutorial for the LAMP Setup on Ubuntu 18.04.
If you guys have any queries or issues, let me know in the comment sections.